2x4basics 90192 Персонализиран комплект навеси с покривен покрив, 2x4

Brand:Hopkins Towing Solutions

3.1/5

lv
196.06

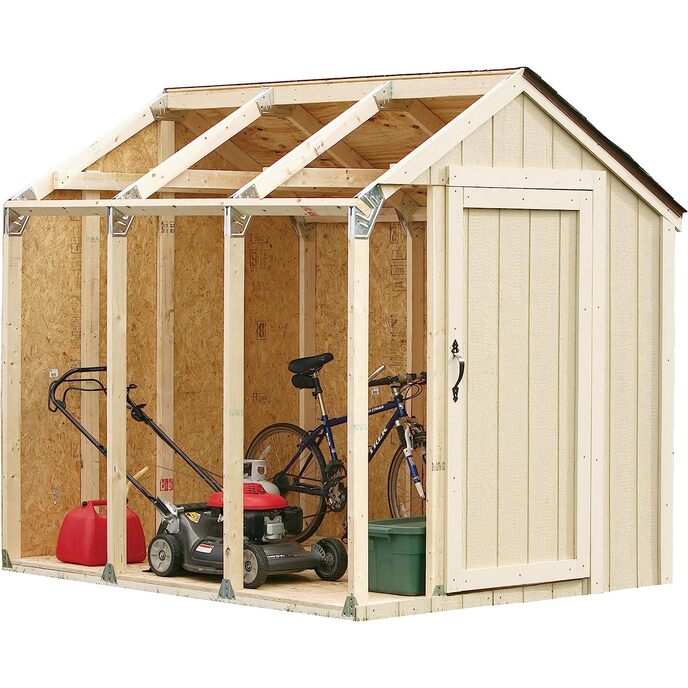
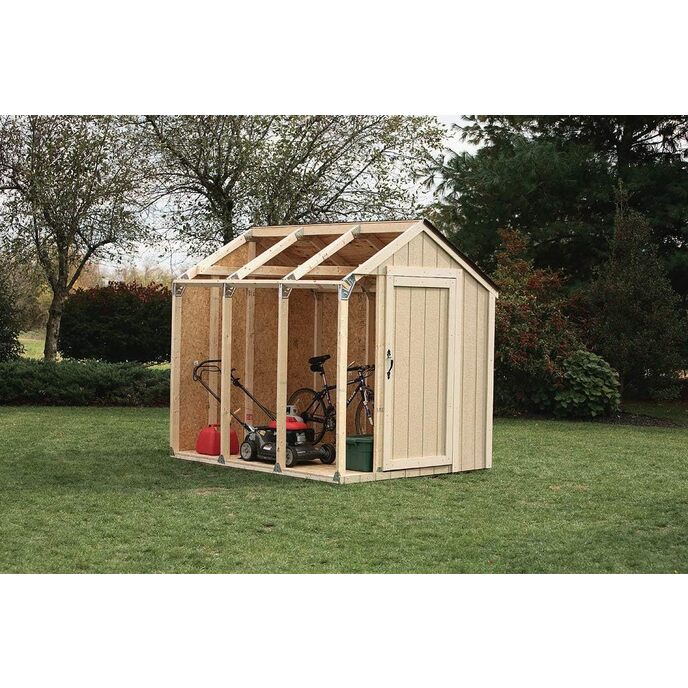
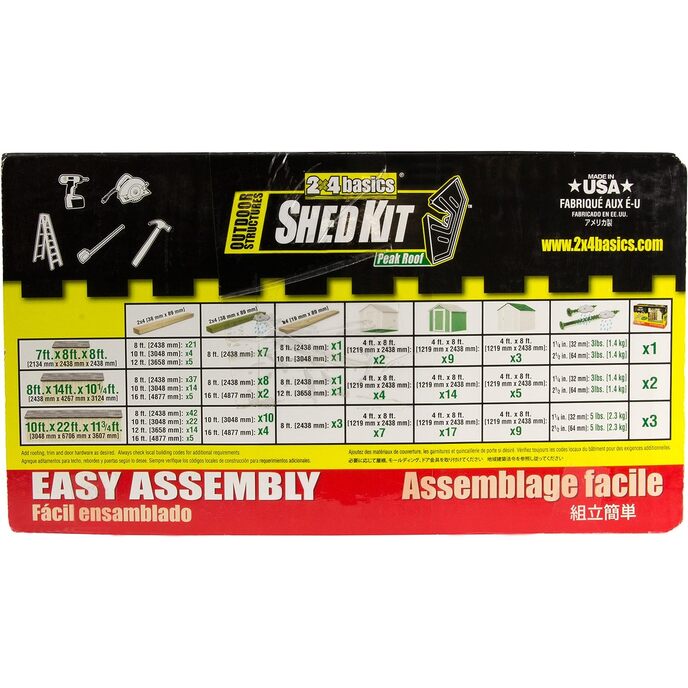
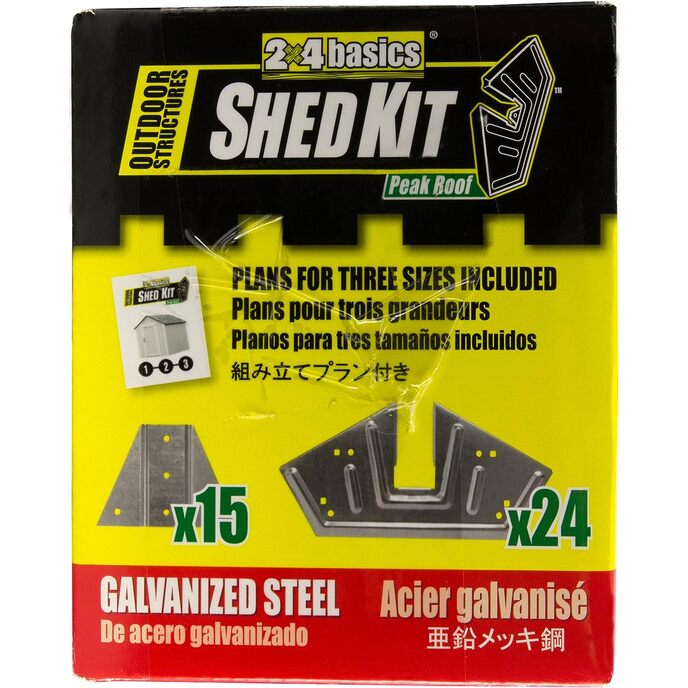
2x4basics 90192 Персонализиран комплект навеси с покрив в стил Peak е чудесен инструмент за изграждане на вашия идеален навес. Галванизираните стоманени конектори са проектирани за използване със здрава рамка 2x4 (38 mm x 89 mm), което прави вашия завършен навес построен така, че да издържа на природните стихии. Не са необходими коси или ъглови срезове, за да изградите свой собствен навес с нашите патентовани съединители. Вие определяте размера и купувате един, два или три комплекта, за да направите вашия навес до 10 фута широк и 22 фута дълъг. (3048 mm x 6706 mm). Предоставяме инструкции за навеси с размери 7x8 фута (2134 mm x 2438 mm), 8x14 фута (2438 mm x 4267 mm) и 10x22 фута (3048 mm x 6706 mm).

Няма налични единици
Само прави 90 градусови срезове, не са необходими коси или ъглови срезове. Един комплект изгражда навес до 10 фута, комбинирайте комплекти за навес до 22 фута. Включва скоби от галванизирана стомана с калибър .22, планове за проектиране и инструкции за монтаж. Персонализиращ се комплект навес с висок покрив. Дървеният материал не е включен във всеки комплект.
Assembly Required No
Base Material Alloy Steel
Brand Hopkins Towing Solutions
Color Gray, Ivory
Country of Origin USA
Customer Reviews 4.0 4.0 out of 5 stars 1,316 ratings 4.0 out of 5 stars
Domestic Shipping Item can be shipped within U.S.
Frame Material Galvanized Steel,Wood
International Shipping This item can be shipped to select countries outside of the U.S. Learn More
Is Discontinued By Manufacturer No
Item Dimensions LxWxH 5 x 11.5 x 6.7 inches
Item model number 90192
Item Weight 4.4 Kilograms
Item Weight 9.68 pounds
Manufacturer Blitz USA
Material Wood
Product Dimensions 5 x 11.5 x 6.7 inches
Style Peak Roof
Top Material Type Alloy Steel
Water Resistance Level Waterproof

3.1

9 Review
5 Star
56
4 Star
17
3 Star
11
2 Star
6
1 Star
11

Напишете вашето мнение

Вашият имейл няма да бъде публикуван. Всички задължителни полета са маркирани с*

Scritto da: Ved
Chicken coop
This kit was very easy to use and saved me a lot of time and money. My husband and I are not experienced builders so I think in all it took us 2-3 days to build but to be honest the hardware cloth for the coop was the most time consuming. I would definitely recommend this kit! I love my new chicken coop!
Scritto da: Mike H.
Worked good, but instructions not the best
Bought the smaller shed kit that can build a 10x 8 shed, and modified it to a 6x5 without flooring so I can build a well house. So for me, it took a bit of extra time reading and trying to understand the directions, which aren't the best, so I could modify the build. The angled roof brackets are thin, but they are mainly meant as guides to provide the correct angles. I dont think they are meant for anything structural really- the 2x4s do that. So even though you don't have cut any angles on the 2x4s with this kit, I did angle cut the ends so they fit in inside the brackets better, which internet makes it a bit sturdier. For this kit, its a 30 degree slope/cut. Once I figured out the correct lengths of each board for the base, the trusses, and height I wanted it, I pre-assembled the trusses and base. Then I started adding the wall studs. Besides the flimsy anchor brackets included, I bought 2x4 angle brackets to help keep the studs upright. Then I added the trusses, and the 2x4s across the top. I started to add the plywood exterior afterwards. Because this is at a cabin in remote woods, I didnt have the rest of the wood needed to finish the shed, as it was getting late, so the pictures show whats been completed - in 1 day by the way - as of this review. Overall, this is my 1st real project building something, and although I am mechanically inclined, this kit definitely helped in getting this project started. So depending on your own project, take your time, get things prepped with the tools needed and enough area to work in, and measure 3 times because you only get 1 chance to cut correctly. Finally, you WILL need a 2nd person to help at various stages, even if just holding something in place.
Scritto da: Michael
Great instructions brackets not so great????
Ok instructions great clearly made and easy to understand. In my opinion the parts thats that come with it are to me cheaply made, well look at the differences in my pictures you be the judge. Sturdiness well I can’t say not with the brackets that come with this kit because I’ve replaced most of them and will probably change what’s left too. I can also say that most people could probably build this shed with the instructions mostly by yourself but I would not recommend it. I had to take mine all apart except the floor. My best friend came over and with his help the shed is coming out much better than when I tried to do it alone. Understand this is my first time doing anything like this so you will have to judge for yourself if or when you buy this shed kit. Overall for someone that can’t afford getting the sheds that cost mostly over a thousand dollars this kit is for you but wood is not cheap either but at least you can do this at your own pace a little bit at a time. I will try and update this when I’m done..update and I’m not done well being that the brackets that come with the shed kit are proprietary if you damage any you won’t have enough to finish and since my knowledge in angle cuttings nada! I have to order another kit just so I can finish my shed, (more updates soon) I hope???? update frame solid super strong for me, the upgrades for the 2x4’s has a made all the difference in my opinion but you should decide for yourself. One important thing you should know not go skimpy with the level perfect or nothing. Eeeeehh “it’s ok shouldn’t cause a problem doesn’t have to be perfect” attitude will go badly will make one more update. Tomorrow I’ll put up some pics to show were we’re at so far.
Scritto da: Jean Minnaar
Nice plans but a little flawed
Simple plans once you realize schematics apply to one or the other floor plan. I built the 8X7 model (with lower walls so as to stay within the HOA's height restrictions). The reason for not giving it a 5 out of 5 rating is that: 1) The plans call for a floor that is 8' long and also a roof that is 8' long. Wow! No overhang? No tolerance for walls that may not be perfectly upright? 2) The hardware that keeps the studs upright are not strong enough. You may need a second person to hold things up for you or you may have to add small angle brackets on the inside as you go. I reduced the floor by 6 inches in length. I used almost 5 pounds of 2 1/4 screws. I also pre-drill the holes so that I do not have to deal with 2X4s splitting. Suggestions for other buyers: 1) Use the excessive roof cutoffs for racks. 2) Put a sheet metal angle piece on the exit to save the floor. 3) If the shed will be put on a concrete slab, put wheels on the floor frame (at the time you build that). That way you can push the shed around as you wish. I thought about the wheels too late and ended up put ting2 inch PVC pipes under the shed to move it back and forth to be able to get to the back that was up against a wall. 4) Whatever other plywood cutoffs you have, put them down on the floor. That way you do not waste them (you will have a use for them later on), they help protect the floor and they do not take up any valuable space..
Scritto da: BrownBrady
Relatively Easy to Build
The media could not be loaded. I bought the Peak Roof 8x7 model. If you have the tools, basic carpentry skills, and a helper, you can put this together in one weekend. The assembly instructions are not described in any language but easy to understand as illustrated for anyone with average IQ and carpentry skills. The instructions for different size models are on the same manual so make sure you cross out the parts and cut list for the irrelevant ones or you might end up wasting material. I almost did, but luckily, the cut I made was longer so to correct it, I just had to cut off a bit more length. It is important to make sure the platform is as level as possible and all boxes as square as possible. If I were to do this all over again, I would pre-cut all the parts ahead of time. Depending on your finishing materials, your total cost may vary. I used house wrap, shingles, and vinyl siding. I also put it on 6 concrete blocks on skids which added more to the cost. We have been using the shed for 2 months now and we are very happy about the extra space that was freed up in our garage. I attached a video time lapse of our build. I recommend this product.
Scritto da: Neil
Great product. Easy to customise.
Excellent product. I wasn't sure about buying it after reading a couple of negative reviews elsewhere but opted to take the plunge. I bought two of these kits to create a 14x8 foot shed. It took me a while to buy all the wood needed. I went over the instruction booklet quite a lot and found it easier to use a bright highlighter to isolate the instructions just for my size shed (there are instructions on the one booklet to create three shed sizes). I spent an afternoon measuring and cutting down all the wood to the cutting list at the front of the manual and labelled the wood with a thick marker. I found the design easy to adapt. The door goes on one end according to the plans but I wanted the door in one corner on the longest edge. Plenty of measuring and double checking there. It took me about two full days to put the frame together and to clad most of it with OSB board. I am due to felt it shortly. Very pleased with how solid and easily it went together. I would recommend two people perhaps but managed it on my own with the exception of the three long roof joists which fitted into the brackets. Feather board to finish off the shed. ????
Scritto da: Natalie
I used this kit to make a greenhouse!
I really liked this kit. The metal pieces arrived in a box with full instructions and nice illustrations. I followed all the steps for the 8X7 size and it went together easily with no fuss at all. All straight edge cuts of 2X4s and simple to do. I used a skill saw, tape measure. variable drill and a level. To comply with local regulations and to have strength against wind, I used two foot pieces of rebar pounded into the ground at an angle through the base. (If you don't know where underground wiring/plumbing is call before you pound.) I changed the cross bars in the floor to have garden spaces on the ground underneath for spring and fall planting,. Because I was not putting plywood on the outside (which adds it's own strength and structural support) I put in extra cross pieces, extra screws at multiple places (especially the attachment to the base), and I built in sturdy shelves to suit my needs. I then used Tuftex panels instead of plywood for the exterior. The result was my wonderful greenhouse that was already proven sturdy enough to take several prairie severe thunderstorms. I can highly recommend this kit as even with my modifications it was easy as pie with my very basic carpentry skills. Check local regulations before you order. Plan the base carefully according to your local conditions and needs so it won't blow over. Make sure the base it is absolutely square and secure. The rest follows easy.
Scritto da: Richard S.
Useful piece of kit
I used this for building an L-shaped childrens playhouse, adapting the instructions. It generally works well and makes construction easier than having to make mitred joints. However, the plates for joining the roof and uprights are not exactly mirror-image symmetrical, so I suggest fixing the plates only on one side of each upright and truss, then placing the roof apex and eaves timbers, and only then adding the plates on the reverse side of each joint. If you follow the written instructions and place all the plates before assembly, the apex and eaves will not align. Also, be aware that the plates have very sharp edges. Handle only with gloves, or be prepared to file down the edges to make them safe.
Scritto da: Amazon Customer
Makes it easy to build
I bought 2 kits for an 8x14 shed. It went together amazingly. I did modify the floor plans as the way they want the floor joists built was not how I wanted it. I used treated 2x4 with 3/4” plywood for the floor for strength. The one thing is it doesn’t tell you what plywood to use so you have to check other shed plans to get the correct plywood. I used 3/8” OSB for the walls and roof. Those who said the brackets are too flimsy, they may be at first but once the rafters are added it’s way more stable. I did add screws into the bottom of the studs at an angle for extra stability. Overall, I am very happy with how it went together. One thing I suggest to others is get the instructions off the website and study them. You can also buy your lumber off the instructions and pre cut all of it.

Свързани продукти

Открийте нашата международна мрежа

Изпращаме до 28 държави, над 200 000 продукта. Бъдете в течение, абонирайте се за бюлетина.

Array